
Today we will review a few simple steps to reduce paint waste and improve profits. There are many factors that contribute to paint and material waste. We will briefly cover equipment, product, and process in an effort to give you key actionable items that will assist you in quickly identifying areas where your shop can improve.
Equipment
Equipment is the most overlooked element of material profit in today’s collision center.
Spray Guns. How many times have we actually taken a look at what our technicians are using to apply Thousands of Dollars worth of paint daily? There is a huge difference in delivery efficiency of the various spray guns and yet we tend to overlook the importance of selecting the best option for maximizing material efficiency. 
The gun is only the beginning of the equation. Using the proper fluid tip for the product being sprayed is just as important. Today’s guns offer a dizzy array of air caps and fluid needle setups. Many people believe that smaller nozzles are more efficient, but this is not always the case. The ideal gun setup will lay the material flat and thin quickly with little effort. Material waste occurs when the painter has to “mash” the applied paint to get the desired look.
Air-What drives the spray gun? Air. The worlds best guns will only work properly when the user delivers the right quality and volume of air to a spray gun. The typical shop spends money on a desiccant system that sits in the booth and assumes that that will make clean air. Typically it is installed and works great for about a week and is then forgotten about. It then becomes a source of contamination as the desiccant beads begin to fly apart from being soaked with water. The mistake? Quality Air is a system, not one piece of equipment. It begins with a compressor and refrigerant dryer that has enough capacity to meet the demands of the shop. The air delivery piping must be sized to deliver the air efficiently. The proper setup reduces the moisture that the final desiccant system sees so that the desiccant media is not overpowered with excessive moisture.
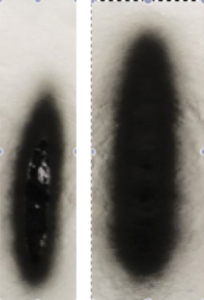
Volume
Look at the difference in these two patterns from the same gun. The pattern on right came out of a gun with a high flow hose and fitting. When guns are supplied with the right volume of air they will apply the finish more efficiently. The pressure is another important consideration. HVLP and reduced pressure guns will literally blow paint into useless vapor if the pressure is set too high. Gun manufacturers recommendations must be followed. There are some great options out there today for setting gun pressure. Look for the tool that provides the least flow restriction. Ideally, gun pressures should be set at the wall regulator. The gun regulator should only be used for special circumstances where lower pressure is momentarily required.
Product
There are huge debates about which products cover the greatest area per gallon of applied material.
Solids. Every TDS Sheet will spell out products % Solids. In short, this percentage is simply “What volume of product is left after the curing process.” Most of today’s low VOC products are between 45% and 55% solids, they leave about half the wet film thickness behind after curing
Viscosity
Todays refinish products are all fairly similar provided the equipment and fluid viscosity are given attention. Every manufacturer specifies viscosity expressed in seconds. DIN4 is one of many viscosity standards used in the industry today. A DIN4 cup is a cup with a small hole in the bottom that leaks paint in a very precise way. The seconds referred to how long it takes before the stream from the cup bottom breaks into drops.
Viscosity is controlled with a solvent. A solvent is anything that thins paint. If the viscosity is too high, the additional solvent will resolve the issue, the opposite is also true. Solvent and catalyst selection are other important factors. Many times technicians choose fast catalyst and fast solvent in an effort to speed paint curing. Often times this will cause the painter to over to apply the film to attain the desired flat finish. Paint sprayed with the proper reducer, catalyst and viscosity will lay out more efficiently ultimately reducing overall material expense.
Process
EstimatingMaterial Efficiency begins at the estimate. We should always try to get paid realistic time on Subjective Damage. Many times it’s just a discussion that we don’t want to have or can’t fully support with photos. Take blends for example. If they are not written up front but must be done to complete the repair, we have missed an opportunity to sell materials! Collision Edge has developed some photo tools to provide supporting documentation for the decision to blend adjacent panels and aides to help justify repair times on subjective damage.

Body Work
Bodywork is the second step in the process of maximizing material usage. Often times primer is misused to “fill” imperfections left in the bodywork. If you find yourself priming 2 and 3 times, chances are improvements could be made in your shop’s bodywork process. On Left, Notice the sand scratches around the filler edge that have filler wiped in them? The dissimilar material expansion will cause these imperfections to show in the first priming, causing second priming. The second priming will mask the imperfection for a while, but will eventually show through after the job has gone home. Notice on the right how uniform the filler edge can be? This comes from the repair edge being properly feathered prior to filler application. In short, better bodywork reduces material consumption to the final repair

Panel Preparation and Cleaning
Everything a technician does to a panel impacts how much material it will take to refinish it. Preparation and cleaning are no exception. Have you ever poured water on a glass table? What does it do normally? it beads and runs to find the lowest point on the table and runs off in streams. What your seeing here is the effect of the surface tension that exists on the glass. Prepared panels are exactly the same. All prepared panels have microscopic abrasions of various sizes along with other things like static charges and contamination. All of these factors fight a paints ability to lay flat quickly.
Consider the following thoughts. Contamination. When you sand a panel, what happens to whatever contaminants that are present? Do they sand off or get sanded deeper into the film? I hope you’ll agree on the latter, plus what effect do these contaminants have on the life of your sandpaper? (Sandpaper ranks 3rd on what you spend money on) Have you ever sanded over tree sap? How did that work out? So, contaminants should be removed prior to sanding. The only way to do this is a 2 step process that addresses both solvent and water-soluble contamination. Usually a Wax and Grease and Waterborne pre-cleaner. Sand Scratch depth. We all love our red scuff pads, I know that. But do you realize that those burgundy bricks are carving microscopic straight line cornrows in the panel your about to paint? Random orbital DA scratches are far easier to cover with paint and with the options a tech can create a really smooth sanding profile. Proper panel preparation and cleaning will lead to paint laying flat quicker and easier with less need to over apply for appearance.
ColorColor represents 30-35% of a shops expense on paint. There are a few careful considerations involved in minimizing waste here. Identify appropriate color variant early in the process using appropriate lighting. The 3M Sun Gun is an excellent choice for color correct lighting. Mix the color for the job 1 time in an appropriate amount for the job. PPG has a great tool called volume estimator that helps technicians think in ounces as opposed to quarts. Jobs are selected based on car size. The size of the car predicates a number of panels. The user sets the standard that he feels is appropriate for his product and shop. Typically solvent shops can use 3oz of unreduced base and 6oz of Ready to Spray clear per panel as it is defined in the system. For instance, a small hood is defined as 2 panels while a large hood is 3 panels. The panels are selected as “paint” or “blend” by multi-taps and the user and a total number of ounces is calculated for the user as a guideline. The main win with volume estimator is helping the technician to think in ounces. Only a few ounces per repair can mean real $ per repair.

Ground Coat
Use the recommended ground coat. OEM plants have long been painting cars to only hide the undercoat and give a uniform finish. If a technician will use the recommended ground coat, a match will be attained in fewer coats with less material applied. Control waste. Use every drop of base mixed. Even if that means dumping waste into similar color containers to use later as a ground coat. Silvers, Golds, Blacks, Whites, etc. Use it all and you will save a lot of money.
Clear Coat
Clear Coat is second behind color in a bodyshops to purchases. Again, all of the above factors with gun setup and viscosity apply. Manufacturer Warranty guidelines typically look for 2-2.5 Mils of dry clear on the panel. Today’s high solid finishes can easily double that thickness. It’s not a bad practice to periodically test the mill thickness of applied clear on blend panels to make sure the appropriate amount is being applied. If more mils are present, clear is being over applied.
As you can see from this discussion, Paint consumption can be affected by many factors. We hope that this discussion has been as valuable for you as it was fun for us to put together. We love solving problems for customers. Please feel free to contact us at www.collisionedge.com.
